5 Ways to Make your Own Makeup Organizers
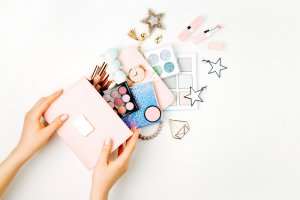
If you have a ton of makeup that’s all just been thrown in a drawer any old how here we’ll show you how to make the perfect makeup organizers. There are so many different ways to do it! Plus, you can even make them by recycling everyday objects.
Believe it or not, elements such as plastic and cardboard boxes, jars and vases, cardboard tubes, bottles, and tin cans can make the ideal makeup organizers. Plus, you can decorate them however you like, separating your makeup and organizing it exactly as you want it. In this next section, we’ll show you some original ways to make your own makeup organizers.
1. DIY makeup organizers – boxes and containers
Make the most of your old cardboard and plastic boxes by using them to create your perfect makeup organizer. If you’re going to keep your organizer in the bathroom, we recommend using plastic boxes, as cardboard will get damp and quickly fall apart.
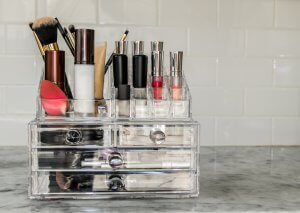
Take your chosen box, and use small pieces of cardboard to make compartments. This way, you’ll be able to divide up the space, so that you can separate and organize your makeup properly. Glue your dividers to the inside of the container, then decorate your box using paint and permanent markers. Small boxes are great for things like cotton wool, lipstick, and eye shadow.
2. Jar and bottle makeup organizers
Recycle your old glass jars and bottles and use them to organize your makeup. These larger containers are great for items such as mascara, brushes, and scissors. If you want, you can decorate your jars with paint or colored paper. Another great option is to use markers to label your jars. You could write things like, “brushes”, “eyeliners”, or “lipstick”.
Using jars and bottles is a really practical option for bathrooms, as they’ll easily withstand the humidity.
3. Sushi mat organizer
This is another really practical way to organize your makeup. You’ll need the following materials:
- Sushi roll mat
- Elastic
- Scissors
- Decorative ribbon

With just a few different materials, you’ll be able to make a really beautiful and practical makeup organizer. Take your bamboo sushi mat and, working horizontally, thread your elastic through the center of the mat to create loops. These will form the compartments for your makeup.
Next, take your ribbon, and glue it to one end of your sushi mat. This will allow you to quickly unroll your mat when you need it, and then roll it back up again, using the ribbon to create a bow. If you want, you can also use more ribbon to decorate your sushi mat makeup organizer.
4. Cardboard tubes and tin cans
Another practical option is to recycle old cardboard tubes and tin cans. You can even glue them straight to the wall, attaching them at the base. Plus, if you take the time to decorate and arrange them, you can give your space a more original look. This is the perfect way to decorate and create more storage at the same time.
5. Recycle your old sewing box
If you have any old jewelry or sewing boxes, you can redecorate them and use them as makeup organizers. Vintage sewing boxes are a great option, as they usually have several drawers and compartments. You can also use wooden tea chests. This is the ideal time to restore them to make a beautiful and unique makeup organizer.
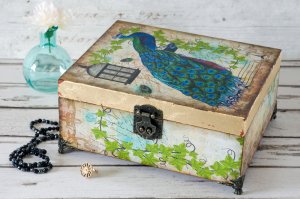
If your sewing box is a little faded or damaged, you can simply sand the surface to remove any of the original paint and varnish. Then, redecorate your box with a new coat of paint, and finish with varnish (either matte or gloss).
You can also use napkins to decorate your new organizer with decoupage. This is a great way to give it a romantic, vintage look. You can then start organizing your makeup, separating it by size and color.
So, there you have it. In just a few simple steps, you can create a really beautiful makeup organizer. If you have enough space, why not try out all these ideas, and arrange them in one corner of your bedroom or bathroom? Learning to recycle old objects is a really practical way to save money, and make some really useful and original items.
If you have a ton of makeup that’s all just been thrown in a drawer any old how here we’ll show you how to make the perfect makeup organizers. There are so many different ways to do it! Plus, you can even make them by recycling everyday objects.
Believe it or not, elements such as plastic and cardboard boxes, jars and vases, cardboard tubes, bottles, and tin cans can make the ideal makeup organizers. Plus, you can decorate them however you like, separating your makeup and organizing it exactly as you want it. In this next section, we’ll show you some original ways to make your own makeup organizers.
1. DIY makeup organizers – boxes and containers
Make the most of your old cardboard and plastic boxes by using them to create your perfect makeup organizer. If you’re going to keep your organizer in the bathroom, we recommend using plastic boxes, as cardboard will get damp and quickly fall apart.
Take your chosen box, and use small pieces of cardboard to make compartments. This way, you’ll be able to divide up the space, so that you can separate and organize your makeup properly. Glue your dividers to the inside of the container, then decorate your box using paint and permanent markers. Small boxes are great for things like cotton wool, lipstick, and eye shadow.
2. Jar and bottle makeup organizers
Recycle your old glass jars and bottles and use them to organize your makeup. These larger containers are great for items such as mascara, brushes, and scissors. If you want, you can decorate your jars with paint or colored paper. Another great option is to use markers to label your jars. You could write things like, “brushes”, “eyeliners”, or “lipstick”.
Using jars and bottles is a really practical option for bathrooms, as they’ll easily withstand the humidity.
3. Sushi mat organizer
This is another really practical way to organize your makeup. You’ll need the following materials:
- Sushi roll mat
- Elastic
- Scissors
- Decorative ribbon
With just a few different materials, you’ll be able to make a really beautiful and practical makeup organizer. Take your bamboo sushi mat and, working horizontally, thread your elastic through the center of the mat to create loops. These will form the compartments for your makeup.
Next, take your ribbon, and glue it to one end of your sushi mat. This will allow you to quickly unroll your mat when you need it, and then roll it back up again, using the ribbon to create a bow. If you want, you can also use more ribbon to decorate your sushi mat makeup organizer.
4. Cardboard tubes and tin cans
Another practical option is to recycle old cardboard tubes and tin cans. You can even glue them straight to the wall, attaching them at the base. Plus, if you take the time to decorate and arrange them, you can give your space a more original look. This is the perfect way to decorate and create more storage at the same time.
5. Recycle your old sewing box
If you have any old jewelry or sewing boxes, you can redecorate them and use them as makeup organizers. Vintage sewing boxes are a great option, as they usually have several drawers and compartments. You can also use wooden tea chests. This is the ideal time to restore them to make a beautiful and unique makeup organizer.
If your sewing box is a little faded or damaged, you can simply sand the surface to remove any of the original paint and varnish. Then, redecorate your box with a new coat of paint, and finish with varnish (either matte or gloss).
You can also use napkins to decorate your new organizer with decoupage. This is a great way to give it a romantic, vintage look. You can then start organizing your makeup, separating it by size and color.
So, there you have it. In just a few simple steps, you can create a really beautiful makeup organizer. If you have enough space, why not try out all these ideas, and arrange them in one corner of your bedroom or bathroom? Learning to recycle old objects is a really practical way to save money, and make some really useful and original items.


