DIY Ideas - Decorating With Plaster Relief Art

If you enjoy experimenting, mixing materials and making things with your own hands, this is the article for you. Today, we want to show you how to prepare plaster relief at home, and use it to decorate all different kinds of objects.
From the preparation to the decoration, this really is such a simple project. And with a little creativity, you can produce spectacular results. Although we’ll be showing you a few of our favorite ideas, it’s important to let your imagination run wild, and your creative juices flow.
When it comes to coloring your plaster relief, you have two options. The first is to make a white plaster and then paint it later on. Alternatively, you can make it in your chosen color right from the start. You also have the option of using a stencil or sketching out your design and applying the plaster over the top.
The best thing is that you can achieve really long-lasting results that are super easy to maintain. You can also use plaster relief on a whole range of different materials, including wood, ceramic, glass, and even on your walls. It’s perfect for decorating furniture, drawers or boxes, mirror and picture frames, ceramic or wooden flower pots… The possibilities are endless. So, let’s take a closer look.
Materials
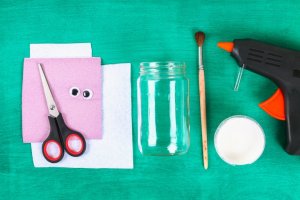
Plaster relief is a material you can find in most specialist stores and comes in a variety of different forms and types. Today, however, we want to look at a simple and low-cost way you can make it yourself at home. You’ll need the following materials:
- Talcum powder
- White glue
- Acrylic paint
- Water
- Gloss varnish spray
- 2 jars or glass containers (one with a lid)
- Small wooden spatula or scraper
- A plastic tube or decorating bag with a nozzle
- Small measuring scoop (like those you use for coffee)
- A stencil of the design you want to create
- Masking tape
- Soft sandpaper
If you want to create white relief plaster or apply color once the plaster is dry, use white acrylic paint. Alternatively, you could simply use acrylic paint in your chosen color to make your plaster.
Making the plaster relief
Regardless of the amount of plaster you want to make, the important thing to remember is you have to use equal amounts of the three main ingredients. For example, you could just start by adding 5 ml or use the plastic measuring spoon to add a small quantity of each and make more as and when you need it.
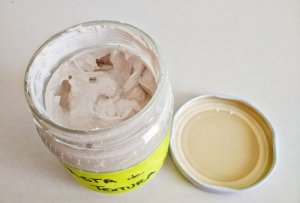
First, put 5 ml of talcum powder in a jar, then add 5 ml of white glue, and another 5 ml of acrylic paint. Mix well with a small spatula until the three materials are combined and have acquired a thicker texture. This should give you your bas-relief plaster. If you don’t think you’re going to need all of it, don’t add the water straight away. That way, you can keep it and use it later on.
The next step is to place all the plaster you’re going to use into the second jar, and add a small amount of water. Add it in a little at a time, stirring as you go, until the plaster reaches a consistency that’s easy to work with. At this stage, you have to be careful not to beat the mixture, as this can create air bubbles that you don’t want in your plaster.
Using a stencil to apply the plaster relief
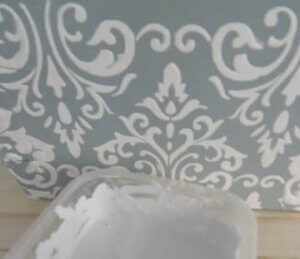
We’re going to start with the simplest technique. First, you need to choose a stencil with the motif you want to use. Then, simply fix the stencil to your chosen surface using a length of masking tape, so that it doesn’t move while you’re applying the plaster.
Apply the plaster over the entire surface of the stencil, as if you were spreading Nutella on your toast. It’s important to make sure it’s completely covered. Then, before the plaster sets, carefully remove the stencil, and leave it to dry for a few hours. Once dry, rub the sandpaper over the plaster to create a smooth, even finish. You then have the option of painting it. Once the paint is dry, simply spray on a coat of varnish. Leave it to dry, and you’re done!
Drawing out your design
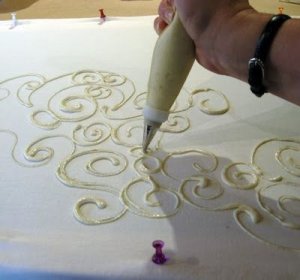
This is another really popular technique that produces great results. It’s ideal for decorating mirror frames and other surfaces where it might be difficult to use stencils. All you need to do is place the plaster into a decorating tube or bag, and attach the nozzle.
Using a pencil, sketch your design straight onto the surface of your frame or another object. Once you’ve finished drawing the entire design, simply apply the plaster using your decorating bag, and using your sketch as a guide. Once the plaster has dried, you can paint it, or simply add a coating of spray varnish, just like we saw earlier. If you want to give your plaster a gold tint, you can color your design with gold acrylic paint.
With a little practice, you’ll start to get fantastic results. This is a really creative technique used by furniture restorers all over the world and is a great way to recycle and redecorate objects around your home.
If you enjoy experimenting, mixing materials and making things with your own hands, this is the article for you. Today, we want to show you how to prepare plaster relief at home, and use it to decorate all different kinds of objects.
From the preparation to the decoration, this really is such a simple project. And with a little creativity, you can produce spectacular results. Although we’ll be showing you a few of our favorite ideas, it’s important to let your imagination run wild, and your creative juices flow.
When it comes to coloring your plaster relief, you have two options. The first is to make a white plaster and then paint it later on. Alternatively, you can make it in your chosen color right from the start. You also have the option of using a stencil or sketching out your design and applying the plaster over the top.
The best thing is that you can achieve really long-lasting results that are super easy to maintain. You can also use plaster relief on a whole range of different materials, including wood, ceramic, glass, and even on your walls. It’s perfect for decorating furniture, drawers or boxes, mirror and picture frames, ceramic or wooden flower pots… The possibilities are endless. So, let’s take a closer look.
Materials
Plaster relief is a material you can find in most specialist stores and comes in a variety of different forms and types. Today, however, we want to look at a simple and low-cost way you can make it yourself at home. You’ll need the following materials:
- Talcum powder
- White glue
- Acrylic paint
- Water
- Gloss varnish spray
- 2 jars or glass containers (one with a lid)
- Small wooden spatula or scraper
- A plastic tube or decorating bag with a nozzle
- Small measuring scoop (like those you use for coffee)
- A stencil of the design you want to create
- Masking tape
- Soft sandpaper
If you want to create white relief plaster or apply color once the plaster is dry, use white acrylic paint. Alternatively, you could simply use acrylic paint in your chosen color to make your plaster.
Making the plaster relief
Regardless of the amount of plaster you want to make, the important thing to remember is you have to use equal amounts of the three main ingredients. For example, you could just start by adding 5 ml or use the plastic measuring spoon to add a small quantity of each and make more as and when you need it.
First, put 5 ml of talcum powder in a jar, then add 5 ml of white glue, and another 5 ml of acrylic paint. Mix well with a small spatula until the three materials are combined and have acquired a thicker texture. This should give you your bas-relief plaster. If you don’t think you’re going to need all of it, don’t add the water straight away. That way, you can keep it and use it later on.
The next step is to place all the plaster you’re going to use into the second jar, and add a small amount of water. Add it in a little at a time, stirring as you go, until the plaster reaches a consistency that’s easy to work with. At this stage, you have to be careful not to beat the mixture, as this can create air bubbles that you don’t want in your plaster.
Using a stencil to apply the plaster relief
We’re going to start with the simplest technique. First, you need to choose a stencil with the motif you want to use. Then, simply fix the stencil to your chosen surface using a length of masking tape, so that it doesn’t move while you’re applying the plaster.
Apply the plaster over the entire surface of the stencil, as if you were spreading Nutella on your toast. It’s important to make sure it’s completely covered. Then, before the plaster sets, carefully remove the stencil, and leave it to dry for a few hours. Once dry, rub the sandpaper over the plaster to create a smooth, even finish. You then have the option of painting it. Once the paint is dry, simply spray on a coat of varnish. Leave it to dry, and you’re done!
Drawing out your design
This is another really popular technique that produces great results. It’s ideal for decorating mirror frames and other surfaces where it might be difficult to use stencils. All you need to do is place the plaster into a decorating tube or bag, and attach the nozzle.
Using a pencil, sketch your design straight onto the surface of your frame or another object. Once you’ve finished drawing the entire design, simply apply the plaster using your decorating bag, and using your sketch as a guide. Once the plaster has dried, you can paint it, or simply add a coating of spray varnish, just like we saw earlier. If you want to give your plaster a gold tint, you can color your design with gold acrylic paint.
With a little practice, you’ll start to get fantastic results. This is a really creative technique used by furniture restorers all over the world and is a great way to recycle and redecorate objects around your home.


