Make your Own Leather Handles in 4 Easy Steps

Leather handles are a huge trend in interior design, and a great example of how DIY can influence decoration. For some time now, specialist design pages have been sharing DIY projects online. Those featuring leather handles have had a great impact on the world of design.
Leather is a beautiful, warm material. It’s perfect for bringing a more natural touch to your home, making it feel homely and welcoming. Today, you can find an infinite variety of furniture featuring leather handles, each of which will bring an authentic and inviting feel to your home.
Furthermore, leather has been used extensively for creating fashion items and accessories for hundreds of years. This shows just how versatile leather is, and why it now holds such an important place in interior design. In the past, however, this material was mainly reserved for upholstering chairs and couches.
Affordable and easy to make, using leather to make furniture handles is a trend that has spread rapidly around the world. As we’ve already mentioned, most home stores sell a variety of furniture featuring leather handles. However, you always have the option of making them yourself. All you really need is an old leather belt.
If DIY isn’t really your thing, you can buy ready-made handles in a whole range of different sizes, colors and prices. You’ll also find a number of different designs, so you can use them anywhere, including bedrooms, bathrooms and kitchens.
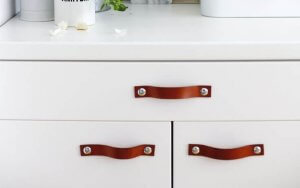
Leather handles
Because it’s such a versatile material, leather has an infinite array of uses. Leather handles are just one of many possibilities. Leather is easy to work with, making it particularly popular in DIY. Even if you don’t have much experience, you can achieve great results in next to no time.
For years now, DIY and design experts have been sharing tutorials on how to make leather handles. They can be used on almost any piece of furniture you like, including dressers, drawers and even tables. This trend has caught the attention of some of the world’s biggest design firms, who have started creating their own designs for the commercial market.
Leather handles have won themselves a place in the world of contemporary design, thanks to their great versatility, and the sense of warmth they bring to our homes.
Make your own leather handles

As we mentioned earlier, you can simply reuse an old belt to make your handles. This small detail can completely change the look of your furniture, and give your home a unique and personal touch.
If you prefer, you could also buy a length of brand new belt leather. You should easily be able to find some online, in a range of different sizes and prices.
As well as your strips of leather, you’ll also need a set of screws. The color you choose will largely depend on your own personal preference, and the overall look you’re going for. The size will also vary depending on the furniture you’re working on, but you could simply use a set of standard 30 mm screws. The head of the screws should be around 5 mm in diameter. However, we should stress again that all this will depend on the look you want to create.
You also have the option of using screw caps, which attach to the top of the screws. These are used for aesthetic purposes, allowing you to cover the screws and make them less conspicuous.
As for tools, you’re going to need a box cutter or stanley knife, a pen, and a ruler, which will allow you to accurately measure and cut your leather handles. You’ll also need a drill, and a drill bit of similar diameter to your chosen screws. The pen will allow you to mark the exact spot you need to drill.
A step-by-step guide to making your own leather handles
Step 1
Using your ruler, measure out the chosen length and width for your new handles, before cutting them using a Stanley knife. Depending on the look you’re trying to create, you could make one or two handles per drawer or door.
Step 2
Once you’ve cut your leather down to size, you’ll need to make holes to allow you to attach your handles to your furniture. You may need to make one or two holes, depending on how you want your handles to look. Take your pen and mark the leather to indicate where you need to drill your hole(s). When it comes to using the drill, you may want to place you’re leather strips on an old table or a scrap piece of wood, so that you don’t damage anything.
Step 3
Once you’ve made your hole(s), thread the screw through it. If you’ve decided to use screw covers, don’t forget to put them on as well.
Step 4
Now that your handles are ready, it’s time to attach them to your furniture. When it comes to leather handles, you have two options. The first option is to place them horizontally, in exactly the same way as traditional handles. The second, more stylish and ergonomic option is to place them vertically.
As you can see, making your own leather handles is a really low-cost and simple way to renovate your furniture. They’re really eye-catching and will look great anywhere in your home.
Leather handles are a huge trend in interior design, and a great example of how DIY can influence decoration. For some time now, specialist design pages have been sharing DIY projects online. Those featuring leather handles have had a great impact on the world of design.
Leather is a beautiful, warm material. It’s perfect for bringing a more natural touch to your home, making it feel homely and welcoming. Today, you can find an infinite variety of furniture featuring leather handles, each of which will bring an authentic and inviting feel to your home.
Furthermore, leather has been used extensively for creating fashion items and accessories for hundreds of years. This shows just how versatile leather is, and why it now holds such an important place in interior design. In the past, however, this material was mainly reserved for upholstering chairs and couches.
Affordable and easy to make, using leather to make furniture handles is a trend that has spread rapidly around the world. As we’ve already mentioned, most home stores sell a variety of furniture featuring leather handles. However, you always have the option of making them yourself. All you really need is an old leather belt.
If DIY isn’t really your thing, you can buy ready-made handles in a whole range of different sizes, colors and prices. You’ll also find a number of different designs, so you can use them anywhere, including bedrooms, bathrooms and kitchens.
Leather handles
Because it’s such a versatile material, leather has an infinite array of uses. Leather handles are just one of many possibilities. Leather is easy to work with, making it particularly popular in DIY. Even if you don’t have much experience, you can achieve great results in next to no time.
For years now, DIY and design experts have been sharing tutorials on how to make leather handles. They can be used on almost any piece of furniture you like, including dressers, drawers and even tables. This trend has caught the attention of some of the world’s biggest design firms, who have started creating their own designs for the commercial market.
Leather handles have won themselves a place in the world of contemporary design, thanks to their great versatility, and the sense of warmth they bring to our homes.
Make your own leather handles
As we mentioned earlier, you can simply reuse an old belt to make your handles. This small detail can completely change the look of your furniture, and give your home a unique and personal touch.
If you prefer, you could also buy a length of brand new belt leather. You should easily be able to find some online, in a range of different sizes and prices.
As well as your strips of leather, you’ll also need a set of screws. The color you choose will largely depend on your own personal preference, and the overall look you’re going for. The size will also vary depending on the furniture you’re working on, but you could simply use a set of standard 30 mm screws. The head of the screws should be around 5 mm in diameter. However, we should stress again that all this will depend on the look you want to create.
You also have the option of using screw caps, which attach to the top of the screws. These are used for aesthetic purposes, allowing you to cover the screws and make them less conspicuous.
As for tools, you’re going to need a box cutter or stanley knife, a pen, and a ruler, which will allow you to accurately measure and cut your leather handles. You’ll also need a drill, and a drill bit of similar diameter to your chosen screws. The pen will allow you to mark the exact spot you need to drill.
A step-by-step guide to making your own leather handles
Step 1
Using your ruler, measure out the chosen length and width for your new handles, before cutting them using a Stanley knife. Depending on the look you’re trying to create, you could make one or two handles per drawer or door.
Step 2
Once you’ve cut your leather down to size, you’ll need to make holes to allow you to attach your handles to your furniture. You may need to make one or two holes, depending on how you want your handles to look. Take your pen and mark the leather to indicate where you need to drill your hole(s). When it comes to using the drill, you may want to place you’re leather strips on an old table or a scrap piece of wood, so that you don’t damage anything.
Step 3
Once you’ve made your hole(s), thread the screw through it. If you’ve decided to use screw covers, don’t forget to put them on as well.
Step 4
Now that your handles are ready, it’s time to attach them to your furniture. When it comes to leather handles, you have two options. The first option is to place them horizontally, in exactly the same way as traditional handles. The second, more stylish and ergonomic option is to place them vertically.
As you can see, making your own leather handles is a really low-cost and simple way to renovate your furniture. They’re really eye-catching and will look great anywhere in your home.


