Using the Crackle Technique to Restore your Furniture

In this article, we’ll be taking a closer look at how to recreate this popular furniture restoration technique. The crackle technique is designed to mimic the effects of the passage of time and gives furniture an authentic aged look.
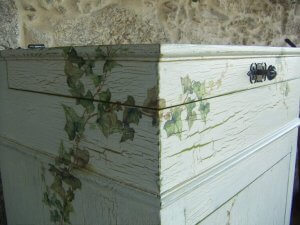
In simple terms, this technique involves creating cracks across the surface of an object. This gives a really elegant and stylish finish that will bring character and personality to your home. There are a few different variations on this technique, depending on the overall look you want to create.
The crackle technique is relatively simple. All you need are the right materials and some practice. Plus, it can be used on all different kinds of surfaces, so you don’t have to limit yourself to wooden furniture. It can also look fantastic when applied to resin, plaster, or even cardboard. Don’t be afraid to let your creative juices flow!
The crackle technique is a great way to upcycle and renovate your furniture. However, one important aspect to keep in mind before you get started is that it won’t be suitable for everything.
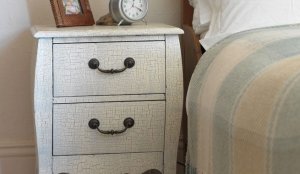
Classic or vintage-style furniture or accessories are ideal for trying out this technique. Conversely, we wouldn’t recommend using it on modern items, as the two styles would clash with one another.
Preparing your furniture
Although there are some variations on the crackle technique, the steps for preparing the surface you’re going to work on are the same. First, start by cleaning the surface thoroughly, removing any dust or dirt that might have built up. To do this, use a damp cloth or soft sponge.
Next, you’ll need to prepare the primer. For this step, it’s important to consider the type of wood or material you’re working on. In some cases, you may need to strip the wood or sand it to ensure that the primer sticks to it properly.
Apply a coat of primer and, once dry, sand it again. Clean the surface a second time to remove any dust left behind by the sandpaper. Once that’s done, you’re ready to apply a coat of acrylic paint, using your chosen base color.
You’ll have to apply two coats of paint, making sure to allow ample time for the first layer to dry before starting on the next. Remember, the base color is the one you’ll see underneath the cracks, so it’s important to choose a different color to the top coat. Chalk paint produces fantastic results, as it sticks well to any surface.
The crackle technique
If you want the results to look stylish and professional, it’s really important to make sure your acrylic paint is completely dry before you move on to this next step.
The key to this technique is to use crackle glaze. It should be easy to find in any specialist DIY store. Use a flat brush to apply the glaze over every surface. Once again, it must be allowed to dry completely, following the time indicated in the instructions.
Once dry, it’s time to apply the paint you’ve chosen for your top coat. As we mentioned earlier, this should be a different color to the paint you used for your base coat. If the base coat is light in color, the top coat should be darker, and vice versa. This is a great way to create contrast.
The crackle effect occurs because of the difference in drying rates. Acrylic based-paints are slow-drying, while crackle glaze is quick-drying. This causes cracks to appear almost immediately.
If both the paint and the glaze had the same drying speed, this result simply wouldn’t occur. You can also use a hairdryer to speed up the process.
Variations on the crackle technique
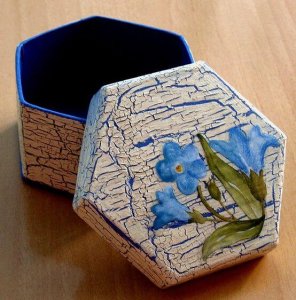
So far, we have mainly focused on the basic crackle technique. However, you can achieve different effects by playing around with the materials slightly. Depending on the look you want to create, you can introduce small variations in the process. These changes will alter the size of the cracks, creating either small, medium or large cracks.
- Small cracks: in this case, you’ll need to apply the crackle glaze, and dry it with a hairdryer. Next, apply the final coat of paint, only this time using a damp sponge. Finally, use the dryer to apply more heat.
- Regular cracks: to achieve this look, apply the crackle glaze and allow it to dry completely. Then, dilute the paint with a little water, and apply it using a brush. Let it dry completely. This technique produces more natural, linear cracks.
- Large cracks: apply the crackle glaze with a large brush. Instead of letting it dry completely, dilute the paint with water and apply it while the glaze is still wet. This technique will create larger cracks.
What are you waiting for?
As you can see, this technique isn’t all that complicated, but it can produce stunning results. If you have a piece of furniture, lamp stand, mirror frame, or any other item that needs a new lease of life, it’s the perfect opportunity to try out this beautiful technique.
In this article, we’ll be taking a closer look at how to recreate this popular furniture restoration technique. The crackle technique is designed to mimic the effects of the passage of time and gives furniture an authentic aged look.
In simple terms, this technique involves creating cracks across the surface of an object. This gives a really elegant and stylish finish that will bring character and personality to your home. There are a few different variations on this technique, depending on the overall look you want to create.
The crackle technique is relatively simple. All you need are the right materials and some practice. Plus, it can be used on all different kinds of surfaces, so you don’t have to limit yourself to wooden furniture. It can also look fantastic when applied to resin, plaster, or even cardboard. Don’t be afraid to let your creative juices flow!
The crackle technique is a great way to upcycle and renovate your furniture. However, one important aspect to keep in mind before you get started is that it won’t be suitable for everything.
Classic or vintage-style furniture or accessories are ideal for trying out this technique. Conversely, we wouldn’t recommend using it on modern items, as the two styles would clash with one another.
Preparing your furniture
Although there are some variations on the crackle technique, the steps for preparing the surface you’re going to work on are the same. First, start by cleaning the surface thoroughly, removing any dust or dirt that might have built up. To do this, use a damp cloth or soft sponge.
Next, you’ll need to prepare the primer. For this step, it’s important to consider the type of wood or material you’re working on. In some cases, you may need to strip the wood or sand it to ensure that the primer sticks to it properly.
Apply a coat of primer and, once dry, sand it again. Clean the surface a second time to remove any dust left behind by the sandpaper. Once that’s done, you’re ready to apply a coat of acrylic paint, using your chosen base color.
You’ll have to apply two coats of paint, making sure to allow ample time for the first layer to dry before starting on the next. Remember, the base color is the one you’ll see underneath the cracks, so it’s important to choose a different color to the top coat. Chalk paint produces fantastic results, as it sticks well to any surface.
The crackle technique
If you want the results to look stylish and professional, it’s really important to make sure your acrylic paint is completely dry before you move on to this next step.
The key to this technique is to use crackle glaze. It should be easy to find in any specialist DIY store. Use a flat brush to apply the glaze over every surface. Once again, it must be allowed to dry completely, following the time indicated in the instructions.
Once dry, it’s time to apply the paint you’ve chosen for your top coat. As we mentioned earlier, this should be a different color to the paint you used for your base coat. If the base coat is light in color, the top coat should be darker, and vice versa. This is a great way to create contrast.
The crackle effect occurs because of the difference in drying rates. Acrylic based-paints are slow-drying, while crackle glaze is quick-drying. This causes cracks to appear almost immediately.
If both the paint and the glaze had the same drying speed, this result simply wouldn’t occur. You can also use a hairdryer to speed up the process.
Variations on the crackle technique
So far, we have mainly focused on the basic crackle technique. However, you can achieve different effects by playing around with the materials slightly. Depending on the look you want to create, you can introduce small variations in the process. These changes will alter the size of the cracks, creating either small, medium or large cracks.
- Small cracks: in this case, you’ll need to apply the crackle glaze, and dry it with a hairdryer. Next, apply the final coat of paint, only this time using a damp sponge. Finally, use the dryer to apply more heat.
- Regular cracks: to achieve this look, apply the crackle glaze and allow it to dry completely. Then, dilute the paint with a little water, and apply it using a brush. Let it dry completely. This technique produces more natural, linear cracks.
- Large cracks: apply the crackle glaze with a large brush. Instead of letting it dry completely, dilute the paint with water and apply it while the glaze is still wet. This technique will create larger cracks.
What are you waiting for?
As you can see, this technique isn’t all that complicated, but it can produce stunning results. If you have a piece of furniture, lamp stand, mirror frame, or any other item that needs a new lease of life, it’s the perfect opportunity to try out this beautiful technique.


