How to Convert a Door into a Table

If you care about recycling, converting a door into a table could be the perfect option for you. In this article, we’re going to explain how to do it step-by-step.
Plus, this is ideal if you love DIY. DIY – or do it yourself – items are very similar to handmade objects. The main difference is that handmade items usually have a more professional finish, while DIY objects normally feel personal and special.
In the world of design, the use of recycled wood is becoming more and more common in interior decorating. It’s important to understand that, even a few years ago, it would have been unthinkable to use recycled wood in our homes. However, in recent years, many companies have been making a lot of money creating furniture from this type of wood.
Thanks to these initiatives, we can find a lot of interesting and attractive designs without having to cut down so many trees.
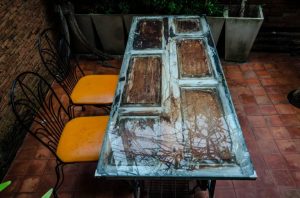
So, in the following article, we want to talk to you about one example: converting old doors into tables. This is a great example of how you can reuse and recycle wood.
To make this project as simple as possible, we’ll give you some important advice on all the different steps you need to follow. We hope you’ll find them useful!
What materials and tools will you need?
In the following list, you’ll find the main materials and tools you’ll need to convert your door into a table. They’re all pretty easy to get hold of. Plus, it’s possible that you actually already have some at home. The main items are:
- Two sawhorses
- Paste or filler to fill in imperfections
- A rasp or sandpaper
- Varnish
- Paint
- Screws
- You can also add a glass table top to the surface of the wood to serve as both decoration and protection.

Once you’ve chosen the door you want to convert into a table, you’ll need to follow the following steps.
1. Preparing your door
Take your chosen door and place it on a flat, stable surface. Once it’s in place, you’ll need to remove any unnecessary features. By this we mean:
- The lock
- The knocker
- The peephole
- Any other features
Next, apply the paste to fill in any holes, cracks and other imperfections in the wood. Obviously, the older the door, the more “defects” you’ll have to cover up. If you discover that there are large sized pieces missing, it might be better to use putty rather than paste.
You can use a spatula to help you apply the paste evenly over the entire surface. This type of paste is usually made from sawdust and synthetic resin.
When you’ve finished applying the paste, it’s important to leave it to dry completely. Sometimes, an hour is more than enough (although putty can take a little longer to dry).
Once dry, both wood paste and putty can be sanded, dyed, waxed, nailed, screwed and varnished.

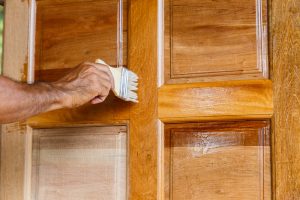
2. Sand and varnish the whole surface
Sanding is a fundamental step you need to carry out before you varnish and/or paint wood. If you sand it properly, the entire surface of your door will be smooth and level.
It’s always best to sand with the grain. Otherwise, you can actually create unwanted grooves on the surface. If you sand properly, you’ll end up with a polished and smooth surface.
To make this task easier, you can buy an electric sanding machine. Once you’re finished, be sure to remove any dust that may have been left behind.
Next, we recommend that you varnish your door, especially if you want to preserve the appearance of the wood. By varnishing, you’ll protect the wood from stains and general damage. It will be more resistant to environmental conditions and any general wear and tear that can occur over time. Plus, it will make the wood look even more beautiful.
If, on the other hand, you want to cover the wood, we’d recommend that you use paint instead of varnish. Both these options will help protect the wood. You simply need to decide whether you want to preserve the look and color of the wood, or if you want to cover it with a different color. If you decide to paint it, acrylic paint always gives a great result.
3. Attach the table legs
Once the varnish or paint is dry, all you need to do is attach what will be the surface of your table to the legs. In this case, we will be using two sawhorses.
You can leave the sawhorses their natural color or paint them to give your table a touch of color. It all depends on your personal taste and the decorative style of the room you want to put your table in.
Finally, we recommend that you use screws to attach the table to the sawhorses. This is the safest, most secure method.
And there you have it – a new table! If you want to go one step further, you can also attach a wooden board or shelf beneath the table top, which you can use for extra storage.
Conclusion
Remember, there are many ways to personalize your table to get a more original and interesting result. Paint is one of your greatest allies.
Never forget that originality, creativity, and innovation have no limits. Converting a door into a table is a process that should only really take you a few hours.